Posts

Showing posts with the label esk8

Electric Mountainboard Build Part 8: Summary

Image
It has been an incredible journey getting the board built, from the initial planning months ago to the relatively quick build time within last month. Almost everything deviated from the original plan at some point, so it is important to always be flexible and adapt to new information and situations.  All Previous Parts: Part 1: Planning/Initial Design Part 2: Parts Changes Part 3: Parts Update Part 4: Drivetrain and Layout Work Part 5: Powertrain and Enclosures Work Part 6: Final Assembly/VESC Programming Part 7: First Ride/Observations Spec Breakdown So how does this board stack up? It certainly isn't the most powerful, or fastest DIY board out there, but even then it punches way above its price class.  Trucks: 16" MBS Matrix II Channel Trucks Wheels: 8" MBS Rockstars with T1 tires Battery: 12S1P 14Ah 622Wh, up to 350A discharge (limited to 100A by XT90 connector) Motors: Dual 6374 7000W Total, Unbottlenecked VESC Version: VESC 75V/300A Range: 20mi (Assumes 20Wh/km) Driv...

Electric Mountainboard Build Part 7: First Ride and Future Improvements

Image
The board is now complete! All that's left to do is test it and go out for a ride! For the previous part, click here ! First Ride The first thing I notice stepping on the board is that bindings feel very strange. I had to do quite a bit of fiddling to get comfortable, and even after a lot of fiddling, my rear foot kept slipping out. I'll need to spend some time on it to get it right. The board feels a lot lighter strapped onto my feet compared to lifting it with my hands. Jumping in place wasn't as bad as I had thought for all the added extra weight. Landing was fine, none of the enclosures were coming loose, and the motor mounts seemed solid.  First tentative stationary air The first takeoff was extremely tentative and slow. I wasn't sure what the torque curve was, so I tried moving the thumbwheel as slow as possible. The remote was still in UART mode, so there was a considerable deadzone before anything actually happened. Once I reached the break point, it slowly roll...

Electric Mountainboard Build Part 6: Final Touches and VESC Configuration

Image
The board is almost ready to go, and there's only a few things left before turning it on for the first time! For the previous part, click here ! Chains Getting the chains sized was a frustrating and messy process, so no pictures were taken. In short, I had a ten foot section of #25 chain, and each drive needed exactly 18" of it, or 72 links. The difficult part was knocking out the pins so I can split it, as I did not have a chain tool. It ended up taking several hours to remove three pins using a mix of hammers, punches, and hex bits. After a while, it eventually worked, and I installed master links so it would be much easier to remove in the future. After verifying the sprockets were in line, the chain went on, and the motor was moved so the chain was under tension, and tightened all the screws. Once the proper tension was found, I removed one screw at a time, and applied Loctite so it doesn't vibrate out. Chains on, it was eventually tensioned a little more before being ...

Electric Mountainboard Build Part 5: Powertrain and Enclosures

Image
Some more parts have come in, and I'm coming onto the final stretches of the build process. A ton of things happened in the past week thanks to the holiday break. For the previous part, click here ! Drivetrain Last time, we left off with the sprockets complete, but no bolts or spacers to fit them. Well the spacers and bolts have arrived, and now it is time to assemble. However, this immediately ran into an unexpected problem. The spacers are narrower than anticipated, and they actually go into the hole where the nut should be on the hub. This shortens the distance considerably, and I needed to put a second spacer on to compensate. However, with two spacers, it is just slightly too long for the 55mm bolt, but the 65mm sticks out quite a bit. Shockingly, the assorted set I got decided to completely skip 60mm, which would have been perfect.  Lots of exposed threads I could shorten the spacers enough to get it to fit on a 55mm bolt, but I couldn't think of a good way to reliably sh...

Electric Mountainboard Build Part 4: Drivetrain and Layout

Image
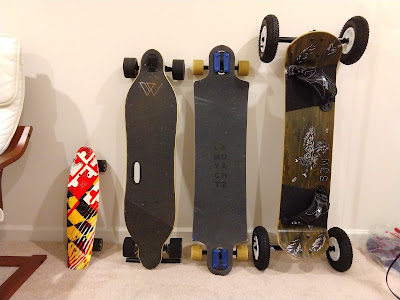
So the board finally arrived, which means I can start work on the hardware components of the build. First off, I would like to comment on how properly massive the mountainboard is compared to my regular longboards. The longboard you see above next to it is 40" long, and is by no means small even in longboard standards. The mountainboard positively towers over it in all dimensions, with a track nearly half a foot wider and far taller. The longboard could easily roll underneath the mountainboard, which gives you an idea of how large it is. Bindings are definitely unfamiliar to me, and the large track and tires give a very distinct feel to the board unlike that of a regular RKP or TKP board. In this log, I will cover work done to the drive train, as well as mounting solutions explored for the boxes. For the previous part, click  here ! Wheel Sprockets The wheel sprockets are one of the more difficult portions of the build, as it's crucial to get it precise enough to spin correctl...

Electric Mountainboard Build Part 3: Taking Stock

Image
So a month's gone by, and almost everything has arrived. The only things remaining are the motor mounts and board itself, which kind of bottlenecks everything. Meanwhile, let's take a look at the current changes for the board and parts that have arrived. For the previous part, click here ! Core Board The core board is unchanged, with the MBS Comp 95 "Birds"  complete as the base board. It however is backordered, and isn't expected to arrive in at least two weeks. This is the main bottleneck, as I can't really do any measuring or test fitting until it arrives. Drivetrain Chain and sprockets The drivetrain has been finalized. The motor mounts will be the Boardnamics Matrix II Mounts , which I have ordered. I have also finalized on chain drives, as the Boardnamics gear drives are still a ways away. The sprockets I have purchased on Amazon, and I have gone with a 10T motor sprocket and 62T wheel sprocket. It might be slightly slow for my liking though, so I am als...